Introduction
Today, in this blog I am trying to provide you the Custom Branding solution Pack. This solution pack will save time and effort while developing the custom sharepoint with publishing sites in sharepoint. It works great. So, we all are good to go and use this re-usable solution pack.
Description
The source code shows how to prepare a structure for Sharepoint Branding solution. This pack contains :
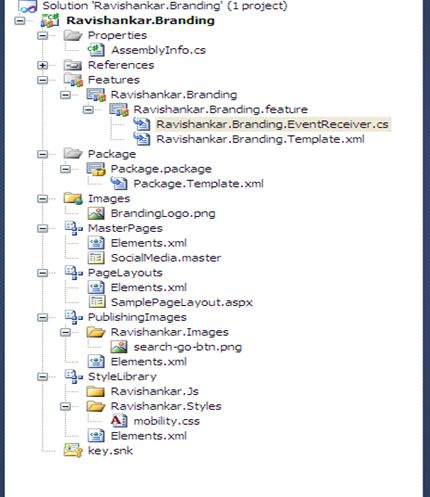
While Developing a sharepoint solution, this is very important to have a solution structure which is very much flexible, re-usable and most important ,it should be simple and understandable. Through this article I am trying to make this task easier for all.
Steps
As I explained, you can use the same solution for your development purpose but I would like to share the steps which will help you understand the solution structure and Code
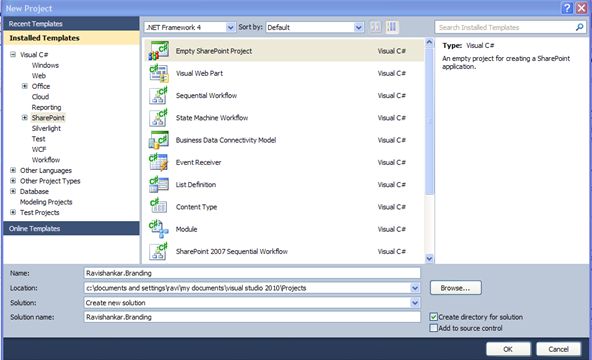
1.Create a Empty Sharepoint project, Give some name (E.g. Ravishankar.Branding)
2. Right Click on the Solution, Click on Add->New item, Select Module
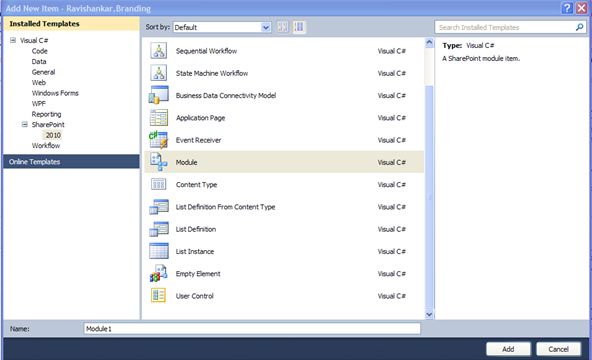
3. Give Name Master Page.
4. Repeat the step 2 for Creating Page Layout, Style library and Publishing Images. Your solution should look like
5. Now The structure is ready, So we can put all custom master pages, page layouts, Images and style sheet & JavaScript's file in the solution structure.
6. Next things which left is to create an eventreciever,this receiver will basically very important as you are deploying and retracting solution every time and you need to set the latest whenever you are deploying the solution. To create EventReciever, Right Click on Feature, Add EventReciever.
7. On the Activation, You can add the code like below to set you master on the activation:
/// <summary>
/// Set the MainMasterPage.master as default master for site.
/// </summary>
/// <param name="properties"></param>
public override void FeatureActivated(SPFeatureReceiverProperties properties)
{
SPSecurity.RunWithElevatedPrivileges(delegate
{
using (SPSite site = properties.Feature.Parent as SPSite)
{
SPWeb rootweb = site.RootWeb;
ChangeSiteMaster(rootweb, RavishankarMasterPage);
}
});
}
Today, in this blog I am trying to provide you the Custom Branding solution Pack. This solution pack will save time and effort while developing the custom sharepoint with publishing sites in sharepoint. It works great. So, we all are good to go and use this re-usable solution pack.
Description
The source code shows how to prepare a structure for Sharepoint Branding solution. This pack contains :
- Master Page Gallery structure
- Page Layout Gallery structure
- Image Gallery
- Styles Library gallery
- Event Receiver
While Developing a sharepoint solution, this is very important to have a solution structure which is very much flexible, re-usable and most important ,it should be simple and understandable. Through this article I am trying to make this task easier for all.
Steps
As I explained, you can use the same solution for your development purpose but I would like to share the steps which will help you understand the solution structure and Code
1.Create a Empty Sharepoint project, Give some name (E.g. Ravishankar.Branding)
2. Right Click on the Solution, Click on Add->New item, Select Module
3. Give Name Master Page.
4. Repeat the step 2 for Creating Page Layout, Style library and Publishing Images. Your solution should look like
5. Now The structure is ready, So we can put all custom master pages, page layouts, Images and style sheet & JavaScript's file in the solution structure.
6. Next things which left is to create an eventreciever,this receiver will basically very important as you are deploying and retracting solution every time and you need to set the latest whenever you are deploying the solution. To create EventReciever, Right Click on Feature, Add EventReciever.
7. On the Activation, You can add the code like below to set you master on the activation:
/// <summary>
/// Set the MainMasterPage.master as default master for site.
/// </summary>
/// <param name="properties"></param>
public override void FeatureActivated(SPFeatureReceiverProperties properties)
{
SPSecurity.RunWithElevatedPrivileges(delegate
{
using (SPSite site = properties.Feature.Parent as SPSite)
{
SPWeb rootweb = site.RootWeb;
ChangeSiteMaster(rootweb, RavishankarMasterPage);
}
});
}
Where
the constants are :
#region
Constants
internal const string masterPagesfolder = "RavishankarMasterPage";
internal const string pageLayoutsFolder = "RavishankarPageLayouts";
internal const string defaultMasterPage = "_catalogs/masterpage/v4.master";
internal const string RavishankarMasterPage = "_catalogs/masterpage/RavishankarMasterPage/Ravishankar.master";
internal const
string publishingImagesFolder =
"Ravishankar.Images";
internal const string publishingImagesPath = "/PublishingImages/";
internal const string publishingImagesPath = "/PublishingImages/";
internal const
string styleFolder =
"Ravishankar.Styles";
internal const string stylePath = "/Style Library/";
internal const string stylePath = "/Style Library/";
internal const
string jsFolder = "Ravishankar.Js";
internal const string jsPath = "/Style Library/";
internal const string jsPath = "/Style Library/";
#endregion
8. On DeActivating the
feature,your code should look like below:
///
<summary>
/// Handles the feature deactivating event
/// </summary>
/// <param name="properties"></param>
public override void FeatureDeactivating(SPFeatureReceiverProperties properties)
{
try
{
if (properties != null)
{
SPSecurity.RunWithElevatedPrivileges(
delegate()
{
using (SPSite site = properties.Feature.Parent as SPSite)
{
SPWeb rootweb = site.RootWeb;
DeleteImagesJsCssFolders(rootweb);
ChangeSiteMaster(rootweb, defaultMasterPage);
DeleteFolders(rootweb, masterPagesfolder);
DeleteFolders(rootweb, pageLayoutsFolder);
}
});
}
}
catch (Exception ex)
{
SPSecurity.RunWithElevatedPrivileges(
delegate()
{
SPDiagnosticsService.Local.WriteTrace(0, new SPDiagnosticsCategory("Ravishankar.Branding", TraceSeverity.Unexpected, EventSeverity.Error), TraceSeverity.Unexpected, ex.Message, ex.StackTrace);
}
);
}
}
As you can see, One the Deactivation, I have called following methods:
As you can see, One the Deactivation, I have called following methods:
-
DeleteImagesJsCssFolders(rootweb);
-
ChangeSiteMaster(rootweb, defaultMasterPage);
-
DeleteFolders(rootweb, masterPagesfolder);
-
DeleteFolders(rootweb, pageLayoutsFolder);
DeleteImageJsCssFolder
As we need to update the Css,images and Javascript on activation and remove the same once we are remove our solution, The code will remove all used css,images and javascript which the solution used.Code is look like below:
private void DeleteImagesJsCssFolders(SPWeb rootweb)
{
SPFolder folder;
string imagesPath = rootweb.Url + publishingImagesPath + publishingImagesFolder;
folder = rootweb.GetFolder(imagesPath);
if (folder != null && folder.ItemCount > 0)
{
folder.Delete();
}
string styleLibraryPath = rootweb.Url +
stylePath + styleFolder;
folder = rootweb.GetFolder(styleLibraryPath);
if (folder != null && folder.ItemCount > 0)
{
folder.Delete();
}
folder = rootweb.GetFolder(styleLibraryPath);
if (folder != null && folder.ItemCount > 0)
{
folder.Delete();
}
string jsLibraryPath = rootweb.Url + jsPath +
jsFolder;
folder = rootweb.GetFolder(jsLibraryPath);
if (folder != null && folder.ItemCount > 0)
{
folder.Delete();
}
}
ChangeSiteMaster
On retraction, we need to reset the master page to the original state, so we have to implement the logic so that existing master page will reset to sharepoint site. The code should be like:
/// <summary>
/// Changes site master page to default
/// </summary>
/// <param name="web">root web of the site</param>
internal void ChangeSiteMaster(SPWeb web, string defaultMasterPage)
{
using (SPWeb currweb = web)
{
currweb.CustomMasterUrl = GetUrlWithTrailingSlash(currweb.ServerRelativeUrl) + defaultMasterPage;
currweb.Update();
foreach (SPWeb childweb in currweb.Webs)
{
ChangeSiteMaster(childweb, defaultMasterPage);
childweb.Dispose();
}
}
}
DeleteFolder
Finally we need to remove the folder which contains Master Pages and Page layouts. Here is the code for that:
/// <summary>
/// Deletes folder from the master page gallery
/// </summary>
/// <param name="rootweb">rootweb of the site</param>
internal void DeleteFolders(SPWeb rootweb, string folderName)
{
//Removing the master pages and page layouts folder.
SPList galleryList = rootweb.GetCatalog(SPListTemplateType.MasterPageCatalog);
SPFolderCollection subfolders = galleryList.RootFolder.SubFolders;
if (subfolders != null && subfolders.Count > 0)
{
SPFolder folder = subfolders.OfType<SPFolder>().ToList().Find(i => string.Equals(i.Name.Replace(" ", ""),
folderName.Replace(" ", ""),
StringComparison.CurrentCultureIgnoreCase));
if (folder != null)
{
folder.Delete();
galleryList.Update();
}
}
}
That's all. We are ready with our Branding Solution.
Summary
As this solution structure is standard and more flexible, it is ready for use for your development purpose. This will saves lot of your development effort and provide a standard solution structure which you can use for multiple application in sharepoint. Feel free to post comment if anything is not clear or need any clarification.
Source code:click here
gud one..
ReplyDeletePresumably the event receivers are not required for a publishing site - that is, we can apply master page and alternate style sheet via the browser UI after Feature is deployed as a solution, correct?
ReplyDeleteIs the publishing master page centered, as this is what I am really after? Thanks in advance :-)
Hi Anthony,
ReplyDeleteThis solution will provide you the automated form where you dont need to do any manual changes like changing master page through UI.Please let me know if anything is not clear.
Hi Anthony,
ReplyDeleteIf we use event receivers(as WEB provisioning Event) to the site collection,Custom master page styles will automatically affected to the newly created sites and sub sites.No need to publish the feature on each site after creation as manually.
Correct Ravi ? Let me know if any thing wrong .
Thanks
SridharS